4.1. Storage Options#
There are several storage options available on the Kempner Institute AI cluster. Each storage option has its own unique features and is designed to meet different requirements. This document provides an overview of the storage options available on the cluster and their key concepts.
4.1.1. Default persistent home directory#
Each user has 100GB of persistent storage that is their home directory. This is for long-term storage of files, checkpoints, datasets, etc. Your home directory is located at:
/n/home<number>/<your user name>
There are 15 different home numbers, and your home directory will be allocated to one of them. For example, Jonathan Frankle’s home directory is at:
/n/home09/jfrankle
This storage is only accessible only to you. There is no cost associated with this storage.
Tip
Check your home directory usage while on login node by running the following command:
df -h ~/
Read more about how to manage a full home directory situation here.
4.1.2. Default persistent lab directory#
Each lab has 4 TB of persistent storage. This is for long-term storage of files, checkpoints, datasets, etc. Your lab directory is located at:
/n/holylabs/LABS/<your lab name>
For example, Jonathan Frankle’s lab directory is at:
/n/holylabs/LABS/jfrankle_lab
This storage is only accessible to members of the lab. There is no cost associated with this storage.
4.1.3. Temporary High-Performance scratch storage (VAST)#
Each lab has 50 TB of scratch storage space. This storage is high-performance, and it is intended to be where you keep data you are actively using for a job (e.g., datasets you’re actively using for a job, checkpoints you’re storing from a job, etc.). That data should be copied from the persistent directories above. Data in scratch folders will be deleted after 90 days, and you should treat it as if it could be deleted at any time.
Warning
Please be aware that employing any methods to alter data in the scratch directory to circumvent the 90-day deletion policy is strictly forbidden and will lead to administrative action by the RC team. For further information, please consult the following resource: RC Scratch Directory Policy.
Your scratch directory is located at:
/n/netscratch/<your lab name>
For example, Jonathan Frankle’s lab directory is at:
/n/netscratch/jfrankle_lab
This storage is only accessible to members of the lab. The prefix of that path may change in the future, so you can use the $SCRATCH environment variable to refer to the prefix of the path:
cd $SCRATCH/jfrankle_lab
There is no charge for scratch storage.
Note
In the scratch storage space under the Users directory, you may have private directory with your username. For new users, this directory will be created. All the users are recommended to manage the data under Lab and Everyone.
4.1.4. Scratch Storage Summary Table#
The following table summarizes the details of the default scratch storage (netscratch):
Feature |
Default Scratch Storage |
|---|---|
Name |
netscratch |
Filesystem Type |
VAST |
Each Lab Quota |
50 TB |
File Retention |
90 days |
Lab Scratch Path |
|
Use Cases |
Optimized for Varieties of Workflows including High I/O AI Workflows |
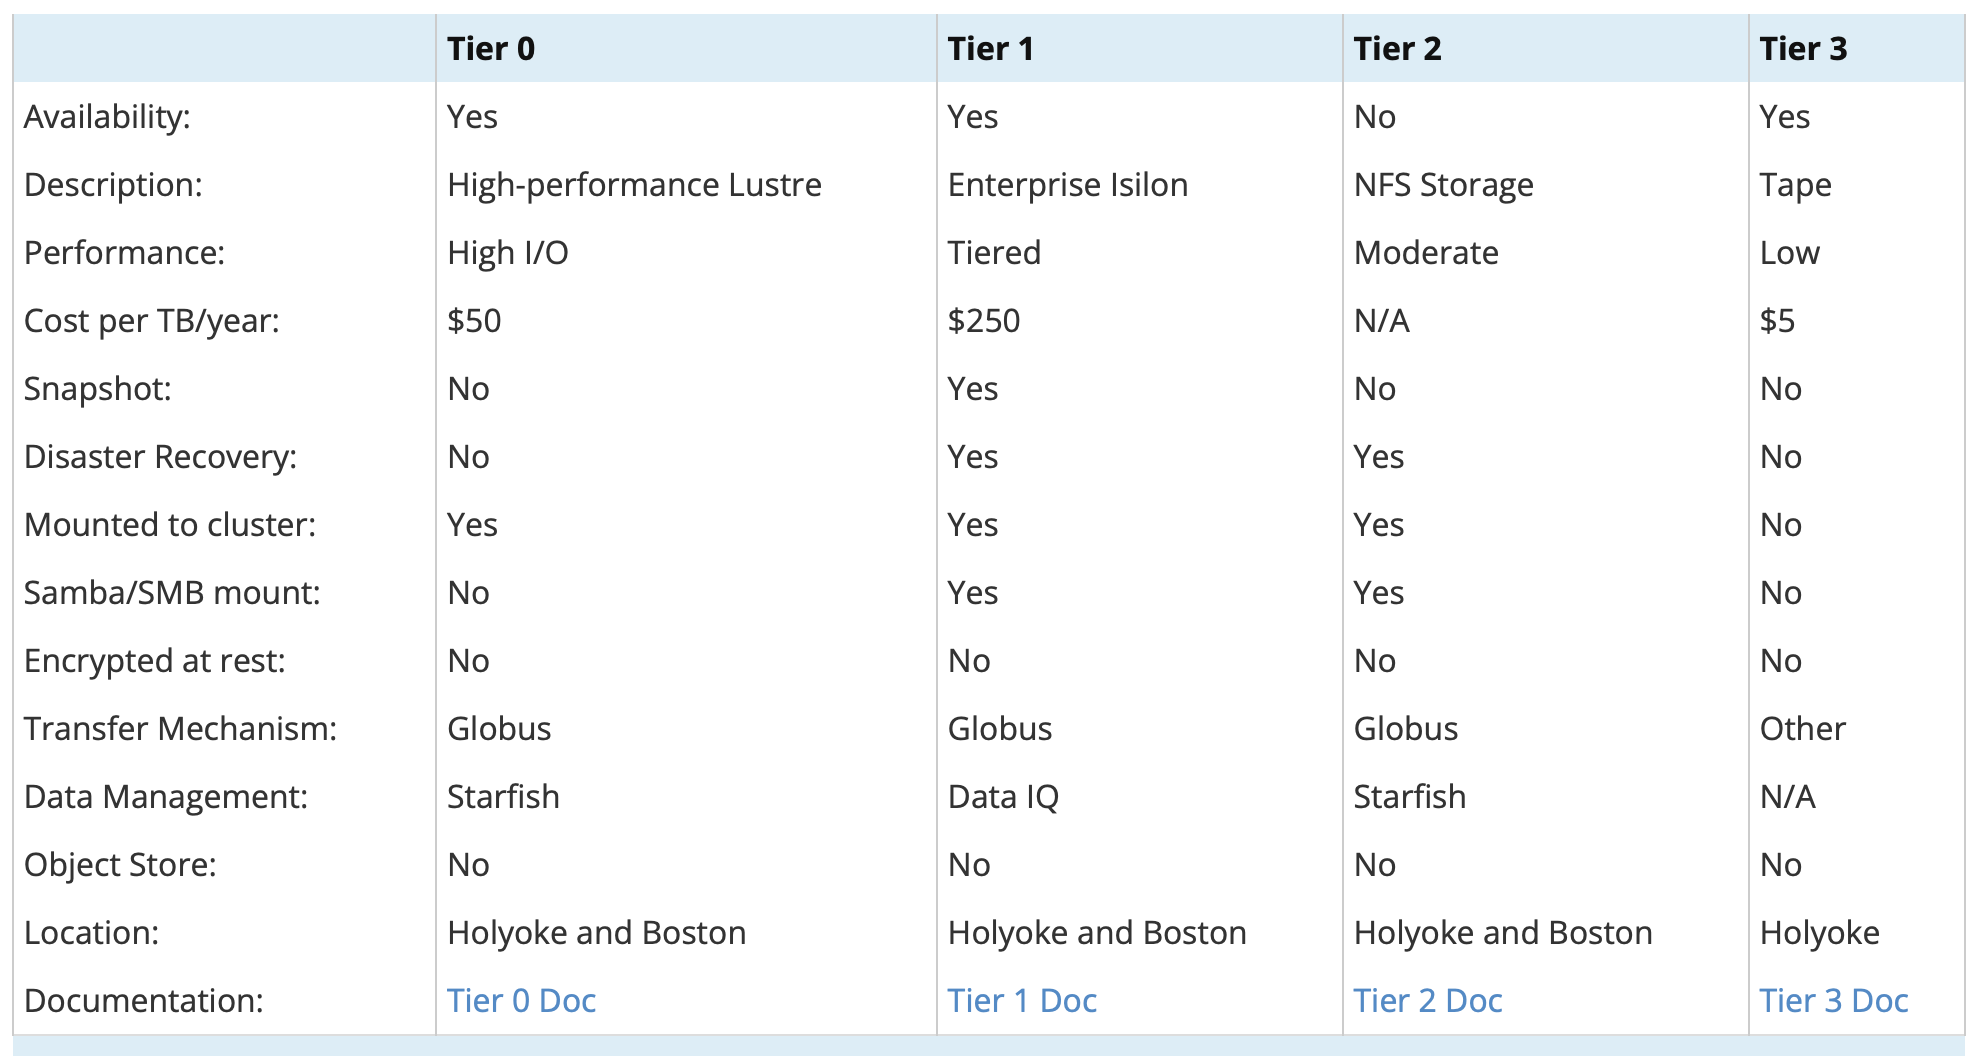
The following table summarizes the storage options available on the cluster, visit data storage for more information.

4.1.5. Note on Lustre Storage Performance#
If you’re running I/O-heavy computational workflows on data stored in any Lustre filesystem (e.g., holylabs, holylfs06), check the LFS stripe count on your directories and optimize it if necessary. Here are a few important points:
The LFS stripe count on a directory determines how data inside that directory is distributed across one or more Object Storage Targets (OSTs), which can significantly improve read/write performance.
For a directory with small files, a single stripe (default) is usually sufficient.
For a directory with large files (several GBs to TBs), using multiple stripes can improve performance. We recommend setting the stripe count to 8 or 16 as a starting point.
To check the stripe count on a directory:
lfs getstripe <directory>
To set the stripe count on a directory:
lfs setstripe -c 16 <directory>
Setting the stripe count on a directory does not apply it to existing files or files in subdirectories. To apply new striping to existing data:
Move the data out of the directory.
Set the stripe count on the directory.
Copy the data back using
cporrsync. Do not usemv, as it won’t retrigger striping.
Optimizing stripe counts can lead to significant improvements in I/O performance for data-intensive workflows. Read more about Lustre storage internals here.